How to let Fibaro Home Center Light notify low battery status once per week (and not every 30 minutes)

Z-Wave device powered by batteries need regular maintenance when the battery is depleted. For a user it is very convenient to be notified whenever the battery on an individual device runs low.

Many users of Fibaro’s Home Center Light, such as me, are annoyed by the way the low battery alarming is realized. While it is very useful to get notified about low batteries, thus having the chance to charge/change them in time, the current implementation in HCL apparently is to just notify the Z-Wave battery level alarm, which is repeated every 30 minutes. When I’m travelling and cannot act immediately I end up with tens or hundreds of notifications in my inbox. In the Fibaro forum someone suggested to turn off the email notification features in the device configuration(s), but that way one risks to charge a battery time. This isn’t ideal, either. Yet another is to do some magic with LUA scenes, but unfortunately Home Center Light doesn’t allow LUA scripting (it’s an exclusive feature on the much more expensive Home Center 2).

Fortunately, Fibaro is providing a REST API to access Home Center Light . It is quite easy to create a script that is triggered e.g. once a week, checks battery levels and sends out some mail when the battery level is low. The script is written in Python, which I don’t particularly like but admittedly Python is quite well established and runs out of the box on many systems. In my case, for example, it is triggered as a cron job on my NAS. It would be very simple to run it on a Windows machine using the inbuilt Task Manager. Coming back tot the script, as a bonus it automatically disables Home Center’s own email notification. As a result, I get a single email once per week in case of low battery levels.

The full script is shown at the end of this post. Let’s have a look at some relevant code snippets.

1. I have actually created a user in the HCL GUI for this particular task, which allows for somewhat granular access rights.


#
# hcl access data is defined globally
# change as needed
#
hcl_host = "192.168.0.1"
hcl_user = 'battery'
hcl_password = 'battery'

2. Here is the API call to get all parameters from all devices from HCL. The second line formats the whole thing as a list so that it can be parsed conveniently. (I’m not sure why the developers of the requests library don’t return that format directly upon a get call. Whatever.)


json_propertyvalues = requests.get("http://" + hcl_host + "/api/devices", auth=(hcl_user, hcl_password))
p = json.loads(json_propertyvalues.text)

3. Then the code cycles through the device list. If the given element contains ‚batteryLevel‘ we look further into it. If it doesn’t, just continue.
In the lower part some interesting fields of the current element are copied to local variables for further processing.


for i in range(0, l):
    if 'batteryLevel' not in p[i]['properties']:
        continue

    properties_batteryLevel = p[i]['properties']['batteryLevel']
    properties_batteryLowNotification = p[i]['properties']['batteryLowNotification']
    id = p[i]['id']
    name = p[i]['name']

4. Finally, check if the reported battery level is below 20% (example), and in that case do something. My script sets a Boolean and generates a string holding the names of the respective devices. That string is then sent via mail to me. Other users may prefer other means of notification.


if properties_batteryLevel <= 20:
        low_battery_alert = True

5. Here is the mentioned bonus – disabling the email notifications in HCL. Note that the HCL user needs to be „admin“ for this to work. I’m not sure why but it seems that Fibaro processes PUT requests only if sent by „admin“. But since the email notifications only need to be disabled once, I guess it is acceptable to run the script as admin only once. After that the user can be changed to something more restricted, as described earlier.


    if properties_batteryLowNotification == 'true': ## Disable email notifictions
      print("-- Disabling stock notification....")
      url = "http://" + hcl_host + "/api/devices/" + str(id)
      headers={"Content-Type": "application/json"}
      json_disable_batteryLowNotification = {
          "properties": {
              "batteryLowNotification": False
          }
      }
      r = requests.put(url, data=json.dumps(json_disable_batteryLowNotification), headers=headers, auth=(hcl_user, hcl_password))
      if(r.status_code == 200):
          print("-- Done.")
      else:
          print("--- ONLY ADMIN USER CAN CHANGE THIS SETTING ---")

For those who are interested here is the full script:


#pip install requests OR python -m pip install requests
import requests
import json
import sys
import os
import re
from smtplib import SMTP_SSL as SMTP       # this invokes the secure SMTP protocol (port 465, uses SSL)
from email.mime.text import MIMEText

#
# hcl access data is defined globally
# change as needed
#
hcl_host = "192.168.0.1"
hcl_user = 'battery'
hcl_password = 'battery'

#
# Raise in case of any low battery
#
low_battery_alert = False
low_battery_alert_s = ""

#
# Here the main script starts
# Read all device properties from HCL
#
json_propertyvalues = requests.get("http://" + hcl_host + "/api/devices", auth=(hcl_user, hcl_password))
p = json.loads(json_propertyvalues.text)
l = len(p)

#
# Cycle all devices and print out result if battery powered
#

for i in range(0, l):
    if 'batteryLevel' not in p[i]['properties']:
        continue

    properties_batteryLevel = p[i]['properties']['batteryLevel']
    properties_batteryLowNotification = p[i]['properties']['batteryLowNotification']
    id = p[i]['id']
    name = p[i]['name']

    if properties_batteryLevel <= 20:
        low_battery_alert = True
        low_battery_alert_s = low_battery_alert_s + name + " " + str(properties_batteryLevel) +"\n"

    if properties_batteryLowNotification == 'true': ## Disable email notifictions
      print("-- Disabling stock notification....")
      url = "http://" + hcl_host + "/api/devices/" + str(id)
      headers={"Content-Type": "application/json"}
      json_disable_batteryLowNotification = {
          "properties": {
              "batteryLowNotification": False
          }
      }
      r = requests.put(url, data=json.dumps(json_disable_batteryLowNotification), headers=headers, auth=(hcl_user, hcl_password))
      if(r.status_code == 200):
          print("-- Done.")
      else:
          print("--- ONLY ADMIN USER CAN CHANGE THIS SETTING ---")

###
### Send email in case of alerts
### taken from here: 
### http://stackoverflow.com/questions/64505/sending-mail-from-python-using-smtp
###

if low_battery_alert:
    SMTPserver = 'mail.some-mail-service.com'
    sender =     'HCL'
    destination = ['someone@some-mail-service.com']

    USERNAME = "user-1"
    PASSWORD = "password-1"

    # typical values for text_subtype are plain, html, xml
    text_subtype = 'plain'

    content=low_battery_alert_s
    subject="HCL low battery alert"

    try:
        msg = MIMEText(content, text_subtype)
        msg['Subject']=       subject
        msg['From']   = sender # some SMTP servers will do this automatically, not all

        conn = SMTP(SMTPserver)
        conn.set_debuglevel(False)
        conn.login(USERNAME, PASSWORD)
        try:
            conn.sendmail(sender, destination, msg.as_string())
        finally:
            conn.quit()
            print("Alert email sent")

    except Exception as exc:
        sys.exit( "mail failed; %s" % str(exc) ) # give a error message 

How to let Fibaro Home Center Light notify low battery status once per week (and not every 30 minutes)

How to display event and temperature time series for Fibaro Home Center – using Docker, Influxdb and Grafana all running on a Synology NAS

This is supposed to be a description of what I’ve done to solve a specific problem. It’s not meant to be a tutorial or step-by-step guide. If you want to implement a solution like this, the only way is to RTFM.

Owners for Fibaro’s Home Center or Home Center Light are familiar with the event panel, which presents a configurable list of Z-wave device events. For instance, one can check at what time during the night some motion sensor detected activity. It’s quite cumbersome however to scroll through the list of events, and I also find the option to select/deselect devices isn’t a great user experience. No offence Fibaro but this can be done better.

For temperatures and humidity there are panels that allow display of such values over time. Again, the GUI configurations options seem quite limited and I also notice that the maximum number of values that can be stored seems to be limited. I was never able to capture temperature events for more than, say, a week or so.But I wanted to store EVERYTHING.

So my approach is to store all values that Home Center provides in a dedicated database on a separate machine.  Involving a separate machine opens up the possibility to use modern browser based display of such values. With this idea in mind, different community projects inspired me to set up a tool chain composed of a script accessing Fibaro Home Center’s API, Influxdb and Grafana.

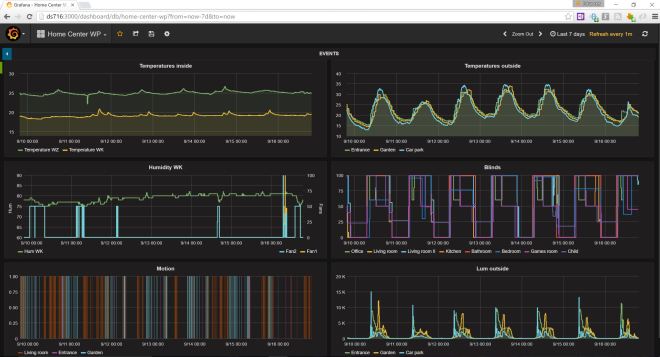
And here is what the result may look like:

measurements

Note that the graphs are totally configurable in terms of what is displayed and how. Any series can be combined in a single panel (e.g. the temperature graph above) or displayed individually in a panel of it’s own. It is also possible to combine totally different series as show on the third plot: Here, humidity and fan speed are displayed in overlay to show how the humidity drops when ventilation is on. This flexibility allows to set up meaningful dashboards, ie. collection of panels, to enable more meaningful dara drilling than the vanilla Fibaro Home Center allows.

events

Similarly even data, such as on/off or open/closed can be shown either in an event list (right) or stats style (left).

A note: The two screenshots are actually a single dashboard. I split them for better visibility.

Influxdb and Grafana are already available as Docker containers, so the decision was easy to let API script run in a Docker container as well. In this case it is a plain Ubuntu container, but you can run the script more or less on any machine that supports Python or whatever language you prefer for that easy task.

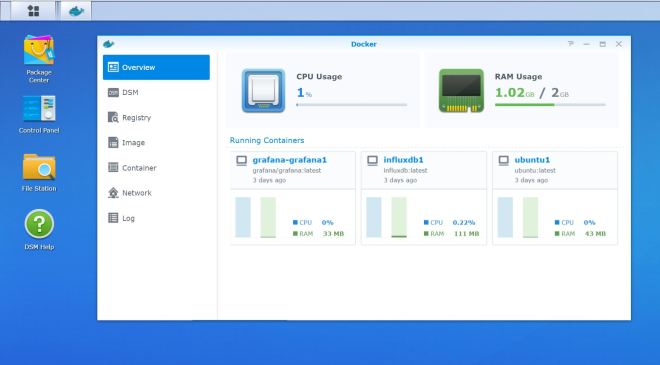
Recently I acquired an Intel based Synology DS716+ which comes with Docker support fully integrated. It’s a no-brainer to let the whole thing run on that Synology hardware platform. This is what it looks like in Synology’s DSM:

20160825 DSM

Setting up Influxdb and Grafana is straight forward with the information provided on the project pages. Hence I’m not going to dwell into that and write another guide. Instead, check out these two resources: InfluxDB – Getting started and InfluxDB – Grafana Documentation.

What I’m going to explore in more detail is the script that takes values via the Fibaro API and throws it at Influxdb. This brings me to a limitation of this setup: The Fibaro API does not support any kind of event notification. This would be a very handy feature to trigger the script and update the database whenever some value actually changes. Hence there is no other way but execute the script periodically. The risk here is some short term event is missed, if it is raised and again cancelled within one trigger interval. This may be the case for things like motion sensors etc. So at the moment this setup is more suited for long term capture and analysis of metrics such as temperature. Maybe in the future Fibaro will come up with a notification API.

Back to the script: In a nutshell it retrieves [‚property‘][‚value‘] from all devices, checks against the database if the value has changed. If it has changed, it is written to the database.

It should be very simple to extend the script with other objects, arrays etc. depending on your needs.

This is what the code looks like (did I mention it is written in Python? I don’t particular like Python but admittedly it’s good for just hacking stuff quickly that works reasonably well).

I chose to let the script run every minute. A simple cron job triggers the execution. In fact cron and the script run in another container. It’s the one named „ubuntu1“ in above DSM screenshot. (NOTE: In the meantime I have migrated this to a Debian container which I found to be lighter than Ubuntu.)


#pip install requests OR python -m pip install requests
import requests
import json

import calendar
import time

from influxdb import InfluxDBClient

timestamp = calendar.timegm(time.gmtime()) * 1000000000

#
# hcl access data is defined globally
# change as needed
#
hcl_host = "192.168.0.1"
hcl_user = 'log'
hcl_password = 'log'

#String-to-Bool. Quite obvious
def str_to_bool(s):
    if s == 'true':
         return True
    elif s == 'false':
         return False
    else:
         raise


# get api response from HC
json_propertyvalues = requests.get("http://" + hcl_host + "/api/devices", auth=(hcl_user, hcl_password))
p = json.loads(json_propertyvalues.text)

l = len(p)

#influxdb access data
host = "192.168.0.2"
port = "8086"
user = "hcloguser"
password = "hclogpassword"
dbname = "hc_log"

client = InfluxDBClient(host, port, user, password, dbname)

for i in range(0, l):
    if 'value' not in p[i]['properties']:
        continue

    property_value_current = p[i]['properties']['value']
    id = p[i]['id']
    name = p[i]['name']
  
    if property_value_current == "true" or property_value_current == "false":

        query = "SELECT last(Bool_value) FROM hcl WHERE device = '" + str(id) + "'"
        result = client.query(query)
        result_points = list(result.get_points(measurement='hcl'))
        property_value_last = result_points[0]['last']
        if str_to_bool(property_value_current) != property_value_last:
            json_body = [
                {
                    "measurement": "hcl",
                    "tags": {
                        "device": id,
                        "name": name
                    },
                    "time": timestamp,
                    "fields": {
                        "Bool_value": str_to_bool(property_value_current)
                    }
                }
            ]
            client.write_points(json_body)
    else:
        query = "SELECT last(Float_value) FROM hcl WHERE device = '" + str(id) + "'"
        result = client.query(query)
        result_points = list(result.get_points(measurement='hcl'))
        property_value_last = result_points[0]['last']
        if float(property_value_current) != property_value_last:
            json_body = [
                {
                    "measurement": "hcl",
                    "tags": {
                        "device": id,
                        "name": name
                    },
                    "time": timestamp,
                    "fields": {
                        "Float_value": float(property_value_current),
                    } 
                }
            ]
            client.write_points(json_body)


How to display event and temperature time series for Fibaro Home Center – using Docker, Influxdb and Grafana all running on a Synology NAS

Off-box scripting and automation with Fibaro Home Center Light

One of the main differences between Fibaro’s Home Center Light and its bigger, more expensive brother Home Center 2 is that HCL does not support LUA scripting for scenes. For quite some time this hasen’t bothered me until recently I wanted to add ventilation to our cellar. Since I don’t want to increase humidity by pulling hot air into the cold cellar it is clear that ventilation should only kick in when the dew point outside is somewhat lower than the one inside.

There were a few sensors in my house that provide temperature and humidity readings. It is easy to derive the dew point from these two measurements using approximation. Since the mathematical calculation cannot be done on the HCL (lack of LUA – see above) I’m using a Raspberry Pi to do this task. As it turns out this is pretty straightforward using a simple script and the Fibaro REST API.

Fibaro REST API access via browser

To check out the REST API, put the following in the address bar of your browser. It will return configuration and sensor data from a single device. Just find a suitable Device ID used in your setup. Temperature sensors give good example.

http://&lt;hcl_host&gt;/api/devices/&lt;device_id&gt;

Initiating actions is just as simple. When you test, just make sure you don’t accidentally set off an alarm or similar. Light switches or roller blinds should be easy targets. This one sets my office blind to 90%.

http://&lt;hcl_host&gt;/api/callAction?deviceID=&lt;device_id&gt;&amp;name=setValue&amp;arg1=90

Unless you are already logged in, the REST calls will ask you for login data. For the purposed of off-box scripting it is a good idea to set up a dedicated user with access limited to the devices that play a role in your automation tasks

Fibaro REST API access via python

1. Request sensor data from HCL via REST API

json_tp = requests.get(&quot;http://&lt;hcl_host&gt;/api/devices/, auth=(hcl_user, hcl_password))

In order to get the main value use this code. E.g. a temperature sensor delivers temperature as main value.

temperature = float(json.loads(json_tp.text)['properties']['value'])

2. Call actions on the HCL via REST API

json_dp = requests.get(&quot;http://&lt;hcl_host&gt;/api/callAction?deviceID=6&amp;amp;name=setValue&amp;amp;arg1=90, auth=(hcl_user, hcl_password)

If this was a dimmer for example, it will set it to 90%

Proof of concept

So how do I realize the dew point controlled ventilation that I talked about in the beginning? There is a very short python script that reads temperature and humidity from two sensors located in my cellar and outside of the house. It then computes the dew points from these values and compares them. Only if the outside dew point is sufficiently lower than inside, the ventilation kicks in.

The script runs on a Raspberry Pi that is also doing other tasks in my home. A cron job fires up the script every 15 minutes.

The example script is here:

#pip install requests OR python -m pip install requests
import requests
import json
import math

#
# hcl access data is defined globally
# change as needed
#
hcl_host = &quot;192.168.0.1&quot;
hcl_user = &quot;automation-user&quot;
hcl_password = &quot;automation-password&quot;

hcl_host_api =&quot;http://&quot; + hcl_host + &quot;/api/&quot;

#
# Minimum differnce between inside and outside dew point to start the fans
# change as needed
#
diff = 5 

#
# Device IDs
# Change as needed
#
#device_dp_outside = &quot;105&quot;
device_temp_outside = &quot;108&quot;
device_hum_outside = &quot;110&quot;
device_temp_inside = &quot;65&quot;
device_hum_inside = &quot;67&quot;

device_fan1 = &quot;123&quot;
device_fan2 = &quot;126&quot;

#
# dewpoint calculation
# Taken from http://pydoc.net/Python/weather/0.9.1/weather.units.temp/
#
def calc_dewpoint(temp, hum):
    '''
    calculates the dewpoint via the formula from weatherwise.org
    return the dewpoint in degrees F.
    '''

    c = temp
    x = 1 - 0.01 * hum;

    dewpoint = (14.55 + 0.114 * c) * x;
    dewpoint = dewpoint + ((2.5 + 0.007 * c) * x) ** 3;
    dewpoint = dewpoint + (15.9 + 0.117 * c) * x ** 14;
    dewpoint = c - dewpoint;

    return dewpoint

#
# get dewpoint from a device that delivers it
#
def get_dewpoint(device_id):

    json_dewpoint = requests.get(hcl_host_api + device_id, auth=(hcl_user, hcl_password))
    dewpoint = float(json.loads(json_dewpoint.text)['properties']['value'])

    return dp

#
# get dewpoint from device(s) that deliver temperature and humidity
#
def get_dewpoint_from_t_h(device_id_temp, device_id_hum):
    json_temp = requests.get(hcl_host_api + &quot;devices/&quot; + device_id_temp, auth=(hcl_user, hcl_password))
    json_hum = requests.get(hcl_host_api + &quot;devices/&quot; + device_id_hum, auth=(hcl_user, hcl_password))
    temp = float(json.loads(json_temp.text)['properties']['value'])
    hum = float(json.loads(json_hum.text)['properties']['value'])

    dewpoint = calc_dewpoint(temp, hum)
    return dewpoint

## Get inside dew point
idp = get_dewpoint_from_t_h(device_temp_inside, device_hum_inside)

## Get outside dew point
odp = get_dewpoint_from_t_h(device_temp_outside, device_hum_outside)

## Compare and take action
if(odp + diff &lt; idp):
    json_fan1 = requests.get(hcl_host_api + &quot;callAction?deviceID=&quot; + device_fan1 + &quot;&amp;name=setValue&amp;arg1=90&quot; , auth=(hcl_user, hcl_password))
    json_fan2 = requests.get(hcl_host_api + &quot;callAction?deviceID=&quot; + device_fan2 + &quot;&amp;name=setValue&amp;arg1=90&quot; , auth=(hcl_user, hcl_password))
else:
    json_fan1 = requests.get(hcl_host_api + &quot;callAction?deviceID=&quot; + device_fan1 + &quot;&amp;name=setValue&amp;arg1=0&quot; , auth=(hcl_user, hcl_password))
    json_fan2 = requests.get(hcl_host_api + &quot;callAction?deviceID=&quot; + device_fan2 + &quot;&amp;name=setValue&amp;arg1=0&quot; , auth=(hcl_user, hcl_password))

Off-box scripting and automation with Fibaro Home Center Light

Zwave Z-way server in a Docker container on a Raspberry Pi

To run Z-way in a isolated docker container on a Raspberry Pi just follow these steps.

1. Download your preferred hypriot image from http://blog.hypriot.com/downloads/. I used hypriot-rpi-20150727-151455.img. Put it on an SD card and boot the Raspberry Pi.

2. Log into the Raspberry Pi and fix the timezone:

dpkg-reconfigure tzdata

3. Unfortunately Dockerhub doesn’t seem to autobuild ARM stuff (or I haven’t figured it out yet), so let’s manually build:

mkdir /root/rpi-docker-zway
cd /root/rpi-docker-zway
wget https://raw.githubusercontent.com/jayrockk/rpi-docker-zway/master/Dockerfile
docker build -t jhertel/rpi-docker-zway . 

Note: this uses the latest version available on razberry.z-wave.me.

Now the container is prepared and ready to go.

4. To run the container first time:

docker run -it  -d -p 8083:8083 -v /opt/z-way-server --name z-way-server jhertel/rpi-docker-zway /bin/sh -c  "/etc/init.d/z-way-server start;/bin/sh"

Point to http://your-raspberry.pi:8083 and you should see the Z-way GUI.

Note: /opt/z-way-server in the container is mounted to the host, so you find it in some directory in /var/lib/docker/volumes. It would be nicer to define „-v /var/lib/docker/volumes/z-way-server:/opt/z-way-server“ but for some reason this doesn’t work. So you have to manually find the correct directory in /var/lib/docker/volumes.

5. To make the container start on boot, add this line to /etc/rc.local

docker start z-way-server

That’s it!

Zwave Z-way server in a Docker container on a Raspberry Pi

Raspberry Pi as a Wireless Bridge

I see that there are tons of guides how to configure a Raspberry Pi as a wireless bridge. Still, none of the ones I checked worked entirely for me, so I want to share how I did it. On particular difficulty is that the br interface vanishes from time to time. In fact each 60 minutes.

1. /etc/network/interfaces looks like this:

auto lo
iface lo inet loopback

auto eth0
iface eth0 inet manual

auto wlan0
allow-hotplug wlan0
iface wlan0 inet dhcp
wpa-ssid "your_SSID"
wpa-psk "your_passphrase"

auto br0
iface br0 inet dhcp
bridge_ports wlan0 eth0

2. We need a bash script that brings up the bridge when it is gone. Filename in my case is autorestart-br0.sh (a bit misleading since it restarts all interfaces). 192.168.0.1 is the address of my gateway router:

#!/bin/bash
if ping -c 2 192.168.0.1 | grep -q "2 received"; then
   echo "192.168.0.1 is reachable"
else 
   date  
   echo "192.168.0.1 is unreachable. Attempting reconnection."
   ifdown -a
   ifup -a
fi

3. Finally we need to call that script every minute or so. I added the following line to crontab to run the script every minute:

* * * * * sudo /home/pi/autorestart-br0.sh
Raspberry Pi as a Wireless Bridge

Synchronize Synology Mail Station with Google Contacts

There is a plugin available for Roundcube (which the Synology Mail Server and Mail Station are based upon). Installing the plugin on a Diskstation running Mail Client is somewhat tricky due to the existing directory structure and the use of PostgreSQL (psql).

I suspect that the plugin may have to be reinstalled after an upgrade of the Synology Mail Station. Remains to be seen.

Here is the procedure for Roundcube Webmail 1.1.1:

Log into Diskstation, download the plugin and extract it

DiskStation> pwd
/root
DiskStation> mkdir tmp
DiskStation> cd tmp
DiskStation> wget http://downloads.sourceforge.net/project/roundcubegoogle/google_contacts-2.12.tar.gz
DiskStation> tar -xf google_contacts-2.12.tar.gz
DiskStation> ls -l
drwxr-xr-x 5 10019 2524 4096 Aug 4 2013 google_contacts
-rw-r--r-- 1 root root 11753 Aug 4 2013 google_contacts-2.12.tar.gz
DiskStation>

Get Zend and extract it

DiskStation> wget https://packages.zendframework.com/releases/ZendFramework-1.12.15/ZendFramework-1.12.15.tar.gz
DiskStation> tar -xf ZendFramework-1.12.15.tar.gz

These two directories need to be located:

  • The Roundcube plugin directory is located at
  • /volume1/@appstore/MailStation/roundcubemail/plugins

  • The lib directory is located at
  • /volume1/@appstore/MailStation/roundcubemail/program/lib/

    Copy google_contacts to the plugin folder

    cp -R google_contacts /volume1/@appstore/MailStation/roundcubemail/plugins/

    Create database table

    cd /volume1/@appstore/MailStation/roundcubemail/plugins/google_contacts/SQL/
    psql --username=postgres roundcubemail < postgres.initial.sql
    cd /root/tmp

    Copy Zend to program/lib

    cp -R ZendFramework-1.12.15 /volume1/@appstore/MailStation/roundcubemail/program/lib/

    Create symlink for Zend

    cd /volume1/@appstore/MailStation/roundcubemail/program/lib/
    ln -s ZendFramework-1.12.15/library/Zend/ .
    cd /root/temp

    Add to /volume1/@appstore/MailStation/roundcubemail/config/config.inc.php


    /* Default addressbook source */
    $config['default_addressbook'] = '0';

    /* database table name */
    $config['db_table_google_contacts'] = 'google_contacts';

    /* max results */
    $config['google_contacts_max_results'] = 1000;

    Add to /volume1/@appstore/MailStation/roundcubemail/config/config.inc.php (look for the /// PLUGINS section)


    $config['plugins'] = array(....xxxx....., 'google_contacts');

    ... and deactivate this line:

    //$config['plugins'] = array();

    Restart Mail Station in DSM.

    Visit http://www.google.com/accounts/DisplayUnlockCaptcha in case the sync doesn't start.

    Synchronize Synology Mail Station with Google Contacts

    Hardening a Synology NAS – assorted tasks

    There are many guides available for hardening a Synology NAS that’s exposed to the internet. Most of them focus on changing the default ports, enabling the firewall, auto-block, etc. These are all features available via DSM.

    In my installation I had to do a few tweaks on the command line to get to the security level I want.

    Use proper SSL certificates

    I got mine from startssl. The process should be the same for any server certificate provider.

    Control panel – Connectivity – Security – Certificate

    Create Certificate – Create certficate signing request

    Once you got the signed certificate back, import it on that same dialog in DSM

    • Private Key: This is server.key. You can get it by exporting the orginal certificate from DSM. It is in the zip file actually.
    • Certificate: ssl.crt you got from startssl
    • Intermedia certificate: sub.class1.server.ca.pem you can download from startssl

    Forcing Web Station https connection (Or: Disallowing http)

    To achieve this, one needs the file .htaccess in the /web folder with the content shown here:

    
    RewriteEngine On
    RewriteCond %{HTTPS} !=on
    RewriteRule ^/?(.*) https://%{SERVER_NAME}/$1 [R,L]
    

    Forcing Webmail to use https

    Quick and dirty – just forward port 80 to 443 Diskstation. When trying to access the Diskstation via http, Error 400 is returned:


    Bad Request

    Your browser sent a request that this server could not understand.
    Reason: You're speaking plain HTTP to an SSL-enabled server port.
    Instead use the HTTPS scheme to access this URL, please.

    Enable 2-factor authentication

    Lots of guides on the web how to do this

    Enable firewall

  • Regionally limit source IP addresses
  • Only allow ports that are really needed
  • Hardening a Synology NAS – assorted tasks

    Unmounting volume1 and fixing low level file I/O error on Synology NAS (and probably other Linux based fileservers)

    Recently I started to backup my data on a friend’s NAS over WAN, and vice versa. It works really great with Synology’s DSM, but that’s a different story. Anyway, during the setup of the backup it would never complete but just stop. Without any specific error message. Bummer.

    Checking the logs I found „File I/O error“ but no hint what file is the culprit. To identify the broken file, I ssh’ed into the box, ran „find“ on the complete volume and see what happens:

    
    DiskStation> cd /volume1/Pictures/
    find * > list.txt
    DiskStation> find * > list.txt
    find: 2014-06/@eaDir/2014-06-20 12.27.29.jpg@SynoEAStream: Input/output error
    find: 2014-06/@eaDir/2014-06-20 12.27.50.jpg@SynoEAStream: Input/output error
    find: 2014-06/2014-06-20 12.27.29.jpg: Input/output error
    find: 2014-06/2014-06-20 12.28.32.jpg: Input/output error
    

    Aha, so it looks like it's those two files. They are indeed broken, no way to copy or delete or otherwise access them.

    Linux has some nice tools to deal with those kind of errors. The challenge here is to unmount volume1 on the Synology NAS. This is not trivial as there are different processes accessing the volume. Let's deactivate them step-by-step.

    - Log into DSM and stop all package services.
    - ssh to the box and stop SQL

    
    DiskStation> /usr/syno/etc.defaults/rc.sysv/pgsql.sh stop
    pgsql stop/waiting
    

    - See what folders are mounted:

    
    DiskStation> df
    Filesystem 1K-blocks Used Available Use% Mounted on
    /dev/root 2451064 671148 1677516 29% /
    /tmp 517336 112 517224 1% /tmp
    /run 517336 1656 515680 1% /run
    /dev/shm 517336 0 517336 0% /dev/shm
    /volume1/@optware 3836399184 2163201048 1673095736 57% /opt
    /volume1/@Archive@ 3836399184 2163201048 1673095736 57% /volume1/Archive
    /volume1/@Client-Backup@ 3836399184 2163201048 1673095736 57% /volume1/Client-Backup
    /volume1/@File-History@ 3836399184 2163201048 1673095736 57% /volume1/File-History
    /volume1/@Pictures@ 3836399184 2163201048 1673095736 57% /volume1/Pictures
    

    Aha, encryptend folders are mounted, of course. Umnount them via DSM.

    - Stop samba

    
    DiskStation> /usr/syno/etc.defaults/rc.sysv/S80samba.sh stop
    

    - Identfiy the processes accessing volume1, and kill them either manually or stopping the related service:

    
    DiskStation> /opt/sbin//lsof | grep volume1
    s2s_daemo 6435 root 8u REG 253,0 11264 2621479 /volume1/@S2S/event.sqlite
    DiskStation> kill 6435
    

    - Check that there are no more processes accessing volume1

    
    DiskStation> /opt/sbin//lsof | grep volume1
    DiskStation>
    

    - Finally, umnount /opt if you have it:

    
    DiskStation> cd /
    DiskStation> umount /opt
    

    - We are ready to unmount volume1:

    
    DiskStation> df
    Filesystem 1K-blocks Used Available Use% Mounted on
    /dev/root 2451064 670560 1678104 29% /
    /tmp 517336 100 517236 1% /tmp
    /run 517336 1468 515868 1% /run
    /dev/shm 517336 0 517336 0% /dev/shm
    /dev/vg1000/lv 3836399184 2163201548 1673095236 57% /volume1
    
    DiskStation> umount /volume1/
    DiskStation> df
    Filesystem 1K-blocks Used Available Use% Mounted on
    /dev/root 2451064 670608 1678056 29% /
    /tmp 517336 100 517236 1% /tmp
    /run 517336 1468 515868 1% /run
    /dev/shm 517336 0 517336 0% /dev/shm
    

    -Start e2fsk to search for errors but don't correct them yet

    
    DiskStation> e2fsck -v -n -f /dev/vg1000/lv
    

    This took around 2h on my 6TB volume

    - If the output is somewhat meaningful (and this is out of this blog post), run:

    
    DiskStation> e2fsck -v -f -y /dev/vg1000/lv
    

    - When finished, reboot your Synology NAS, which now should be free of file I/O errors.

    Unmounting volume1 and fixing low level file I/O error on Synology NAS (and probably other Linux based fileservers)

    Install Raspbian + Kodi + Plex + TV Headend + Media stored on network shares on Raspberry Pi2

    When the Raspberry Pi 2 came out, I immediately figured that I move all my media related functions to that box. There are quite a few pre-built distros with some or even all of the applications I need, but none of them worked as I wanted. So I ended up installing all manually. The system works like a charm since three months.

    Kudos goes to numerous sources found somewhere on the Internet. The ones I notes are mentioned here.

    Here is what I did:

    Install Raspian
    =========
    – follow the standard instructions
    – change host name to something meaningful
    – Run:

    sudo apt-get update
    sudo apt-get upgrade
    sudo apt-get install avahi-daemon
    

    – Run:

    sudo nano /boot/config.txt
    

    and insert

    gpu_mem=128
    ################################################################################
    # License keys to enable GPU hardware decoding for various codecs
    # to obtain keys visit the shop at http://www.raspberrypi.com
    ################################################################################
    
    # decode_MPG2=0x00000000
    # decode_WVC1=0x00000000
    # decode_DTS=0x00000000
    # decode_DDP=0x00000000
    decode_MPG2=0x89d13fcf
    decode_WVC1=0xf1ff9133
    

    Mount external shares
    =========

    sudo -s
    mkdir /storage
    cd /storage
    mkdir mnt-Music
    mkdir mnt-Video
    mkdir mnt-Pictures
    mkdir mnt-TV-Recordings
    
    chmod 777 /storage/
    sudo chmod -R 766 /storage
    sudo chown pi:users -R /storage
    

    – create script: mount-shares.sh

    #!/bin/sh
    n=1
    
    server=192.168.0.1
    type=nfs
    
    until ping -w 1 -c 1 "$server" >/dev/null ;do
    sleep 1
    n=$(( n+1 ))
    [ $n -eq 30 ] && break
    done
    
    mount -t cifs -o username=user,password=user,rw //192.168.0.1/Music /storage/mnt-Music;
    mount -t cifs -o username=user,password=user,rw //192.168.0.1/Video /storage/mnt-Video;
    mount -t cifs -o username=user,password=user,rw //192.168.0.1/Pictures /storage/mnt-Pictures;
    mount -t cifs -o username=user,password=user,rw //192.168.0.1/TV-Recordings /storage/mnt-TV-Recordings;
    

    -add script to /etc/rc.local

    sudo sh /storage/mount-diskstation-shares.sh
    

    Set Samba shares
    =========

    sudo apt-get install samba samba-common-bin
    mkdir /storage/.smb
    mkdir /storage/Downloads
    mkdir /storage/Backup
    mv /etc/samba/smb.conf /etc/samba/smb.conf.original
    /etc/samba/smb.conf
    *****
    [global]
    server string = hank
    workgroup = WORKGROUP
    netbios name = %h
    security = share
    guest account = root
    socket options = TCP_NODELAY IPTOS_LOWDELAY SO_RCVBUF=65536 SO_SNDBUF=65536
    smb ports = 445
    max protocol = SMB2
    min receivefile size = 16384
    deadtime = 30
    os level = 20
    mangled names = no
    syslog only = yes
    syslog = 2
    #name resolve order = lmhosts wins bcast host
    #preferred master = auto
    #domain master = auto
    #local master = yes
    printcap name = /dev/null
    load printers = no
    browseable = yes
    writeable = yes
    printable = no
    encrypt passwords = true
    enable core files = no
    passdb backend = smbpasswd
    smb encrypt = disabled
    use sendfile = yes
    #
    #
    preferred master = no
    local master = no
    domain master = no
    client lanman auth = yes
    lanman auth = yes
    lock directory = /storage/.smb/
    wins server = 192.168.0.1
    name resolve order = bcast wins host
    #
    #
    #
    [Downloads]
    path = /storage/Downloads
    available = yes
    browsable = yes
    public = yes
    writable = yes
    
    [Backup]
    path = /storage/Backup
    available = yes
    browsable = yes
    public = yes
    writable = yes
    

    TVHeadend – manual install from source
    =========

    cd /lib/firmware
    wget https://github.com/OpenELEC/dvb-firmware/raw/master/firmware/dvb-usb-af9015.fw
    
    sudo -s
    
    apt-get update
    
    apt-get install git build-essential pkg-config libssl-dev dvb-tools liburiparser-dev liburiparser1 libavahi-client-dev zlib1g-dev libavcodec-dev libavutil-dev libavformat-dev libswscale-dev libdvb-dev ffmpeg
    
    cd /usr/src
    git clone https://github.com/tvheadend/tvheadend
    cd tvheadend
    #export PKG_CONFIG_PATH=/
    ./configure
    make
    
    reboot
    dmesg | grep dvb ## check if USB TV Tuner initializes correctly
    
    sudo -s
    /usr/src/tvheadend/build.linux/tvheadend -u root -g video -C &


    ## check if tvh web interface comes up and usb tv card is recognized

    nano /etc/rc.local
    

    – insert:

    /usr/src/tvheadend/build.linux/tvheadend -u root -g video -C &
    

    reboot

    sudo nano /usr/bin/tv_grab_file
    

    – insert

    #!/bin/bash
    dflag=
    vflag=
    cflag=
    if (( $# < 1 ))
    then
    cat /storage/Downloads/tv_grab_file.xml
    exit 0
    fi
    
    for arg
    do
    delim=""
    case "$arg" in
    #translate --gnu-long-options to -g (short options)
    --description) args="${args}-d ";;
    --version) args="${args}-v ";;
    --capabilities) args="${args}-c ";;
    #pass through anything else
    *) [[ "${arg:0:1}" == "-" ]] || delim="\""
    args="${args}${delim}${arg}${delim} ";;
    esac
    done
    
    #Reset the positional parameters to the short options
    eval set -- $args
    
    while getopts "dvc" option
    do
    case $option in
    d) dflag=1;;
    v) vflag=1;;
    c) cflag=1;;
    \?) printf "unknown option: -%s\n" $OPTARG
    printf "Usage: %s: [--description] [--version] [--capabilities] \n" $(basename $0)
    exit 2
    ;;
    esac >&2
    done
    
    if [ "$dflag" ]
    then
    printf "tv_grag_file is a simple grabber that just read the ~/.xmltv/tv_grab_file.xmltv file\n"
    fi
    if [ "$vflag" ]
    then
    printf "0.1\n"
    fi
    if [ "$cflag" ]
    then
    printf "baseline\n"
    fi
    
    exit 0
    
    sudo chmod 777 /usr/bin/tv_grab_file
    

    Resource: http://raspberry.tips/raspberrypi-tutorials/raspberry-pi-live-fernsehen-mit-tvheadend/

    Squeezeserver
    =========
    Download the package from the web page below

    sudo dpkg -i logitechmediaserver_7.8.0_all_with_armhf.deb
    

    Resource: http://www.imagineict.co.uk/squeezier-pi

    PLEX
    =========

    cd ~
    wget http://dev2day.de/skeleton.tgz
    tar -xzf skeleton.tgz
    wget http://downloads.plex.tv/plex-media-server/0.9.11.16.958-80f1748/PlexMediaServer-0.9.11.16.958-80f1748-arm7.spk
    mv PlexMediaServer-0.9.11.16.958-80f1748-arm7.spk PlexMediaServer-0.9.11.16.958-80f1748-arm7.tgz
    tar -xvf PlexMediaServer-0.9.11.16.958-80f1748-arm7.tgz
    tar -xvf package.tgz -C skeleton/usr/lib/plexmediaserver
    rm -r skeleton/usr/lib/plexmediaserver/dsm_config
    cd skeleton/usr/lib/plexmediaserver
    find . -iname "*.so" -exec chmod 644 {} \;
    find . -iname "*.so.*" -exec chmod 644 {} \;
    cd ~
    sudo apt-get install fakeroot -y
    fakeroot dpkg-deb --build skeleton ./
    sudo dpkg -i plexmediaserver*
    
    sudo groupadd plex
    sudo usermod -a -G plex plex
    sudo usermod -g plex plex
    sudo passwd plex
    

    – Password: plex

    sudo service plexmediaserver restart
    

    if no problems, then….

    rm skeleton.tgz
    rm -R ~/skeleton
    rm plex*.deb
    

    – Plugin-folder: /var/lib/plexmediaserver/Library/Application Support/Plex Media Server/Plug-ins
    – Default parameters: sudo nano /etc/default/plexmediaserver

    Resource: http://www.htpcguides.com/install-plex-media-server-on-raspberry-pi-2/ ==

    KODI
    =========

    sudo nano /etc/apt/sources.list.d/mene.list
    

    – insert

    deb http://archive.mene.za.net/raspbian wheezy contrib
    
    sudo apt-key adv --keyserver keyserver.ubuntu.com --recv-key 5243CDED
    sudo apt-get update
    sudo apt-get install kodi
    sudo apt-get install kodi-pvr-tvheadend-hts
    
    sudo nano /etc/udev/rules.d/99-input.rules
    

    – insert

    SUBSYSTEM=="input", GROUP="input", MODE="0660"
    KERNEL=="tty[0-9]*", GROUP="tty", MODE="0660"
    
    sudo nano /etc/default/kodi
    
    USER=pi
    ENABLED=1
    

    Resource: http://michael.gorven.za.net/

    Periodic reboot
    ====

    nano /storage/reboot.sh

    – insert

    #!/bin/sh
    echo rebooted on $(date) > /storage/reboot.txt
    sync; sync
    reboot
    crontab -e

    – insert

    0 4 * * * sudo sh /storage/reboot.sh
    Install Raspbian + Kodi + Plex + TV Headend + Media stored on network shares on Raspberry Pi2